How is it November already?!
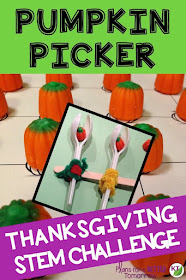
Last week, we left off with the Pilgrims in the New World, with their shelters complete. The next step is to gather available food in the area. That's right, it's time for Pumpkin Picker!
Just a reminder of the challenge order we're following:
- Mini Mayflower (Get to where you're going)
- Protect-a-Pilgrim (Build a shelter)
- Pumpkin Picker (Gather available food)
- Corn Cultivator (Set up a sustainable food source)
- Turkey Transporter (Once all major needs are met, there's time for fun!)
Premise:
Students design a device to efficiently harvest pumpkins (measured in time or number of moves to clear the pumpkin patch).Where Can I Find Out More?
The video walk-through of Pumpkin Picker is embedded below. In it, you'll find information about materials, modifying difficulty level, measuring results, extensions and some tips & tricks to guide you. After you watch it, you'll be better able to guide your students through the challenge. Check it out. However, if you prefer to read, you'll find the video transcribed at the end of this post.
 Where are the Others?
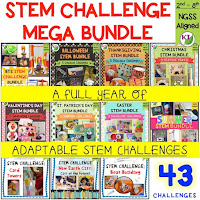
Between Oct. 20 and Nov. 13, I'll be posting one Thanksgiving STEM challenge video every Thursday to my YouTube channel and here on my blog. (The final post will come on a Sunday to give you time to implement before Thanksgiving break!)Until then, you'll find the Thanksgiving bundle briefly described in this post.


All challenges are available individually and in discounted bundles in my TpT store, as well.
Video Transcription
Hi and
welcome to week three of the Thanksgiving STEM challenges. This one is called Pumpkin
Picker. In week one, the Pilgrims came to the new world in Mini Mayflower. In
week two, they built themselves shelters in Protect the Pilgrim. And in week
three, they're going to gather food in order to make sure they don't go hungry.
Before we go any further, let's take a second to look at the materials and the
STEM Challenge Cycle.
This
the STEM Challenge Cycle you should follow for every challenge. I've defined
each stem in another video. You can click on the title now to see the cycle
explained.
So I
have a couple options here for you. My preference is to use the little candy
pumpkins whenever you can. But I found that in some areas they sell these all
the way through Thanksgiving, and I some areas they stop selling them after
Halloween. So you might be too late to get these. If you are, a good substitute
are Rollos, or those little wrapped caramels.
In
this one I have a guideline underneath the pumpkins so that they'll be set up
in perfect arrays, and this one's just a green paper and the students can
determine if they even want to use arrays of what the best pumpkin patch is for
their design.
There
are definitely benefits to both approaches. Either using a guideline so
students know where to place the pumpkins, or allowing them to set it up
however they like. If you use a guideline, you're making sure that all of the
groups have the same pumpkin patch to start with and so comparing the designs
is legitimate.
When
students set up their own pumpkin patch, that has benefits as well. One of the
benefits is that it's basically an extension of the design. Instead of
designing a tool for a specific pumpkin patch, they're designing complimentary
tools and pumpkin patches together at the same time. In order to make it fair,
you need to make sure you give the same amount of pumpkins, or Rollos, or whatever,
to every group so that the comparisons are fair. If you are going to be looking
to extend on this idea of arrays with this challenge, I recommend using 24
pumpkins or 36 because they are many factors, and thus there are many possible
arrays.
So
what students are going to be doing is, they're going to be harvesting the
pumpkins and putting them into a harvest container. So you need something the
students can put the pumpkins in. These foils tins or little styrofoam or
plastic bowl work really well, you can get these at the Dollar Tree. And you do
want to think about the container because the larger the container, the easier
it is. And the smaller container makes it a little bit more challenging in some
ways, and I'll show an example in just a second.
So I
have two designs to test here today. I have one right here, and this is
probably the simplest design you ever did see, but it's pretty effective if
memory serves. So one of the rules is that the students can't actually
physically touch the pumpkins. Oh, I missed one. So as I was saying before, the
size of the container does impact how well it harvests. Now, this will probably
turn upside down a little bit. But if I'm using the bowl, it might be a little
bit more challenging, let's see. I missed one so that'll be a problem.
The
way you're going to have students measure results in this one is either by the
amount of time it takes to actually entirely harvest the pumpkin patch. So in
cases where it doesn't fall into the container, they have to use their tool in
order to pick it back up and put it into the harvest container. The other thing
you can do is have them record the number of moves it takes them in order to
clear the pumpkin patch.
If I
were recording the number of moves it takes me to clear the pumpkin patch,
obviously I need to finish, but I have done two moves and I have cleared 10
pumpkins out of 30. So if I continue at that rate, it should take me a total of
6 moves in order to clear the pumpkin patch. So that creates sort of another
challenge, and you can have them actually record both the total amount of time
and the total number of moves it takes in order to clear the pumpkin patch.
So
let's take a look at our other design here. We have a little claw. This one's
actually working pretty well, it is only getting two pumpkins at a time, but it
is fun. Let's see how the design fares with Rollos. So just a note there, when
I opened like that and I grab my Rollos, I got this one, but this one I missed,
and I went to try to pick it up again, I would count that as a second move. So
even though I only went to the harvest container once, I would count that as
two. You don't need to do that, just make sure that the students know what
counts as a move, and what doesn't count as a move. If you're having them
record that. Again, you can make it a lot simpler by just recording the total
amount of time it takes to clear the pumpkin patch.
To
increase difficulty, you can always increase the size of the pumpkin patch. You
can also require that the tool works well with various arrays. Again, having
them calculate the number of moves it takes to clear the pumpkin patch in
addition to or instead of the amount of time, also requires an element of
strategy on their part, so it also increases difficulty.
To
extend on this, you can continue your studies of the Plymouth colony and the
New World, have students create math problems based on their arrays, based on
the average number of moves it took for different groups to clear the pumpkin
patch. There are many ways to extend this with math.
Look
up some YouTube videos for the world’s biggest pumpkin, it will blow your mind.
And of course the ever popular pumpkin life cycle.
You
have the basics in order to do this on your own in your class, but as always if
you want more than just the basics, check out the resource.
This
November be thankful you don't have to waste your time re-inventing the wheel.
This resource contains everything you need including modifications for use with
second through eighth graders. You'll still need to gather the simple
materials, of course, but the rest is already done. You'll get Aligned Next
Generation Science Standards, links to my STEM Challenge How-to videos to help
you get the most from each challenge, and the Pumpkin Picker Materials list.
In
Teacher Tips you'll find premise and setup, how to increase or decrease
difficulty through the Criteria and Constraints list, measuring results, and
cross-curricular extension suggestions. You'll find an editable Criteria and Constraints
list so you can tailor the challenge to your students.
For
Student Handouts there are two versions, four-page expanded room for response
for younger students, and a two-page condensed space paper-saver version.
You'll also find a set of group discussion questions and a guideline to help
students set up their pumpkin patches. In the Extension Handouts, you'll find
pumpkin writing, math extension and process flow templates, as well as task
card direction and templates.
This
resource is available individually and is part of the discounted Thanksgiving
and Mega STEM Challenge bundles. Links can be found in the description below
the video.
Well,
all right, we're all done with Pumpkin Picker. Again, it's one of those that
looks really simple, but it's deceptive, it can be really tricky.
Be
sure you "like" and "subscribe" and come back next week.
We'll be talking about Corn Cultivator. See you next time.

No comments:
Post a Comment